Monday, December 26, 2016

Fixed-Design vs. Modular Wall Plate

Network wall plates serve as one of the basic components of a structured cabling system, which are usually placed near a workstation. Just as its name indicates, a wall plate is a flat plastic or metal plate that generally mounts in or on a wall. Actually some of the wall plate can even be mounted in floors and ceilings. Wall plates commonly include one or more jacks, here the jack is the connector outlet in the wall plates that allows a workstation to make a physical and electrical connection to the network cabling system. There exist two configurations of wall plates: fixed-design and modular wall plate, let’s see how to choose between them.

Fixed-Design or Modular Wall Plate Description

Before installing wall plate, one decision you have to make is whether to choose fixed-design or modular wall plate.

Fixed-design wall plate has multiple jacks that are molded as part of the wall plate, which means you cannot remove the jacket and replace it with a different type of connector. Fixed-design wall plates are cheap and simple to install, so they are usually used in telephone applications. However, they have limited flexibility since their configuration cannot be changed. Moreover, it is not compatible with high-speed networking systems.
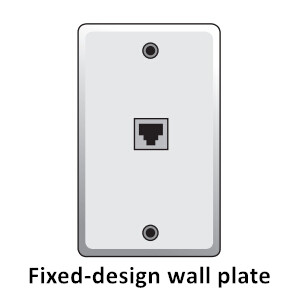
Fixed-design wall plate

Modular wall plates are generic and have multiple jack locations. In a modular wall plate system, this kind of plate is often referred to as a faceplate: unless it has its jackets installed, it’s not a wall plate. Jacks for each faceplate are purchased separately from the wall plates. When using modular wall plates, remember to use the jacks designed for that wall plate system. Because jacks from different wall plate systems are not interchangeable.
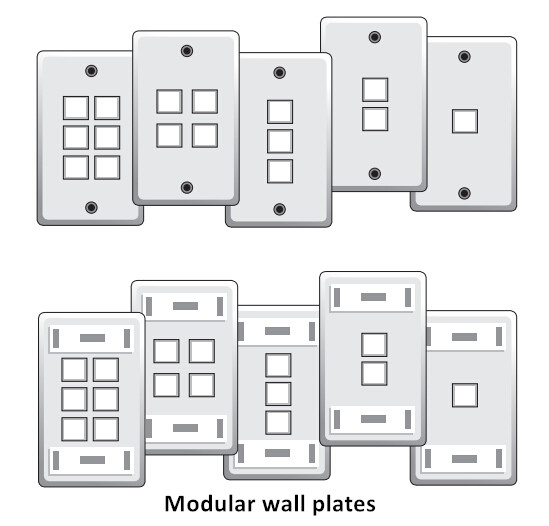
Modular wall plates

Considerations When Choosing Fixed-Design Wall Plate

Before choosing a specific fixed-design wall plate for your cabling system, there are at least three factors you should take into consideration: number of jacks, types of jacks and labeling.

Number of Jacks: Because fixed-design wall plates have their jacks molded into the faceplate assembly, the number of jacks that can fit into the faceplate is limited (mostly one or two jacks). They are usually in a configuration with one jack above the other. Additionally, most fixed-design wall plates are for UTP or coaxial copper cable only.
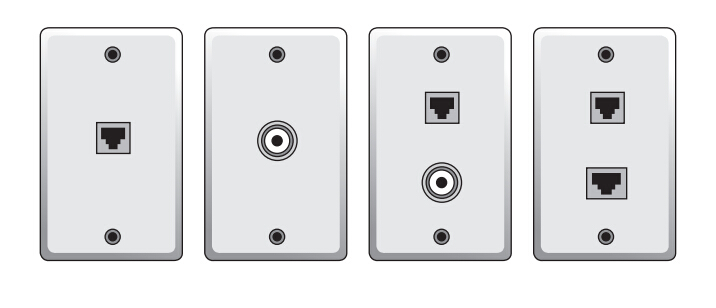
fixed design wall plates with varying numbers of sockets

Types of Jacks: Fixed-design wall plates can accommodate a wide variety of jacks for different types of data-communications media. However, you cannot change a wall plate’s configuration once it is in place. The most common configuration of a fixed-design wall plate is the single six-position (RJ-11) or eight-position (RJ-45) jack, which is most often used for home or office telephone connections.

Labeling: It is rather important to label fixed-design wall plates so that you can distinguish one connection from another. You may find labeling extremely helpful when troubleshooting. Meanwhile, although some jacks look exactly the same, they may be used for a completely different purpose. So it is beneficial to label which is which for better maintenance and easier identification. The most prevalent method for labeling is using adhesive-backed stickers or labels of some kind.

Considerations When Choosing Modular Wall Plate

Modular wall plates have individual components that can be installed in varying configurations depending on your cabling needs. Just like fixed-design wall plates, you have to account for these three factors when making your choice: number of jacks, types of jacks and labeling.

Number of Jacks: When using modular wall plates you firstly have to decide how many jacks you want in each wall plate. Jacks on modular wall plates can be either side by side or over and under. Modular plates come in a couple of different sizes, and the number of jacks a plate can hold is based on the size of the plate. They are available with single-gang (smallest size), double-gang, triple- and quad-gang plates. Generally, a single-gang wall plate can accommodate at most six jacks.
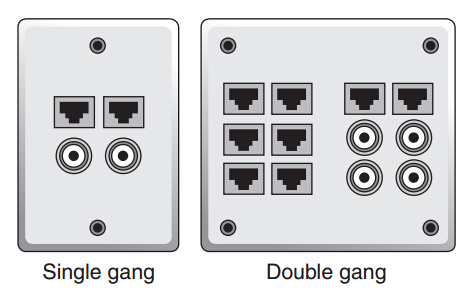
single gang and double gang wall plates

Types of Jacks: As the most common type of wall plate used for data cabling, modular wall plates have the widest variety of jack tapes available. All the jacks available today differ based on a few parameters, including the following: wall plate system type, cable connection, jack orientation and TIA 568B wiring pattern.

Labeling: Just like fixed-design wall plates, modular wall plates use labels to distinguish the different jacks by their purpose. In fact, modular wall plates have the widest variety of labels—varied colors and styles of labeling. However, as with fixed-design plates, the labels are either text or pictures of their intended use, perhaps permanently molded in the plate or on the jack.

Conclusion

Serving as a visible component and an essential part of a structured cabling system, the importance of wall plates cannot be overestimated. In this article, we have reviewed three factors concerning whether to choose fixed-design or modular wall plates. Hope this would be helpful for you to choose the optimum one for your cabling system.
Knowing Cable Ratings: Plenum and Riser Rated Cable

When doing data and voice cabling in premise environment, there is a common question that every installer may confront: Should I use plenum or riser rated cable? Plenum and riser here indicate flame ratings for cables which are defined by National Electric Code (NEC), with the purpose of preventing the spread of fire and smoke in commercial and residential buildings. Then, what is the difference between plenum and riser rated cable? This article will explain to you by making a comparison between them.

What are Plenum and Riser Cable?

The flame rating of cables differs according to various installation situations. Thus to decide which rating is appropriate for your installation environment is critical. So let’s just begin with the basic definition of the plenum and riser cable.
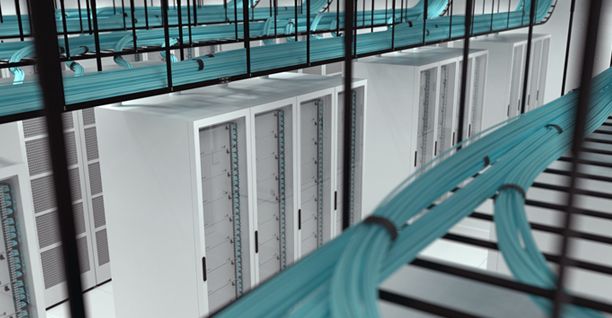
Plenum Cable: A plenum refers to any enclosed area that facilitates environmental air handling. Such as an air conditioning duct or an air routing drop ceiling. It can be any air space between walls, under floors, or dropped ceilings. Plenum cable is designed with a fire-retardant plastic jacket, that is laid in the plenum spaces of buildings. It is held to the most stringent testing of the cables rated by the NEC, rated for both flammability and smoke generation.
plenum rated cable

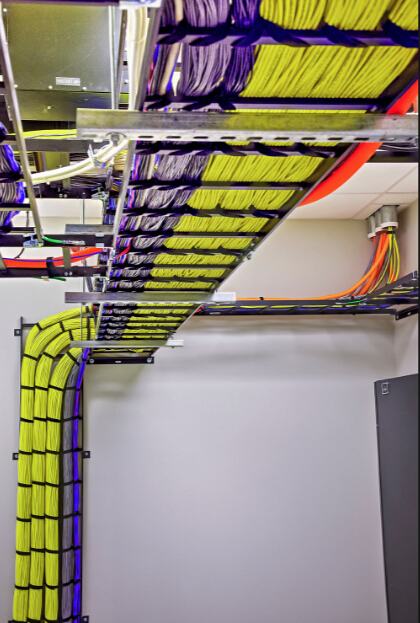
Riser Cable: Riser cables do what their name indicates—they rise between non-plenum vertical applications like floors of multi-story buildings. Riser cables may also penetrate either fire rated floors or walls. Described as backbone cables, riser cables serve as the main conduit of a distribution system for data, voice or video. The cables are only subjected to flame tests.
riser rated cable

Difference Between Plenum and Riser Cable in Application

In this part, we will illustrate the difference between plenum rated cable and riser rated cable from the perspective of their common application situations.
Plenum rated cable is usually made with strict standards required by a plenum space. It is installed to prevent contamination of the air. Requirements for plenum cables dictate the rate at which a flame spreads, as well as the maximum amount of smoke a burning cable may produce. This kind of cable can be applied to commercial and multi-family residential buildings. Plenum rated cables may substitute for riser and general purpose rated cables.
plenum and riser cable application

Riser rated cable is typically run between multiple floors of a building through open vertical shafts. Although these pathways do not handle environmental air, they can easily conduct a fire from one floor to the next if the cable is not properly rated. And the vertical spread of flame would pose a big threat to the safety. To minimize the spread of fire, riser rated cable is required for carrying a minimum of a riser rating. Riser cables may be used for different forms of data communications which also include CCTV video access. It is ideal as well for voice communications.

Plenum and Riser Cable in Cabling Design

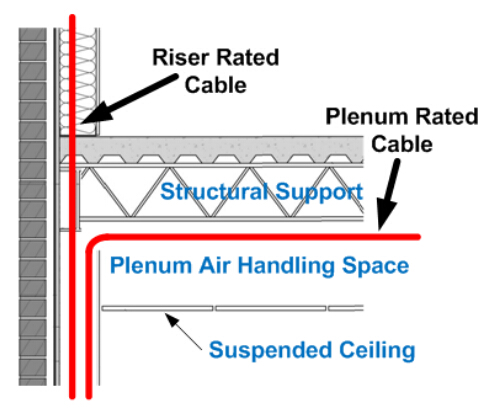
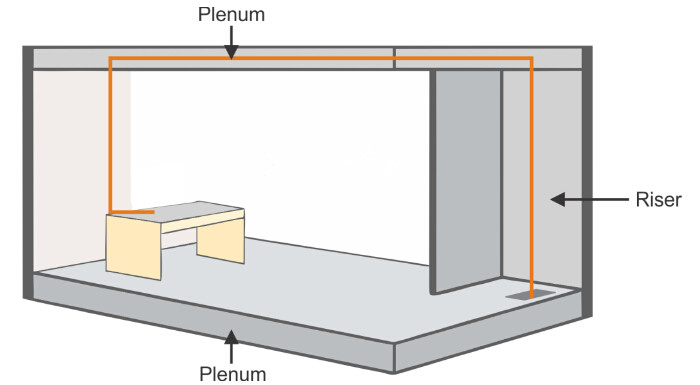
When deploying cable for indoor applications, to plan and design beforehand is definitely critical yet beneficial. If the cables must be deployed in the plenum, it is important to remember that cables that will be deployed there must reach several standards on flammability, heat resistance, and amount of smoke cable generates when burning. Another essential part of installing cable within a building is riser cable deployment. Since riser cable should go through the whole building, it is rather vulnerable in case of fire. This is why riser cable has even more strict fireproof standards than the plenum one. The picture below illustrates the common design of the plenum and riser rated cable in the building.
plenum and riser cable design

Conclusion

Although cable rating is sometimes overlooked by system designers when selecting cables, it is rather vital to the whole installing environment. We have explained the difference between the plenum and riser cable from the perspective of the common application and cabling design, hope that would be informative enough.

Sourcehttp://www.china-cable-suppliers.com/cable-ratings-plenum-and-riser-cable.html

Monday, December 19, 2016

Labeling Cables: the Virtue and Value

Change in wiring is a commonplace in data centers, as the demand for higher bandwidth speeds the installation and updating process of cables and components. Labeling cables is considered as a critical part in data center management, which allows for easier identification and quicker isolation of cables. Meanwhile, a properly labeled cabling system could benefit installers with increased efficiency, profitability and reliability. In this article, let’s talk about the benefits of labeling, and perhaps more important, how to effectively label your cables.

Benefits of Labeling Cables

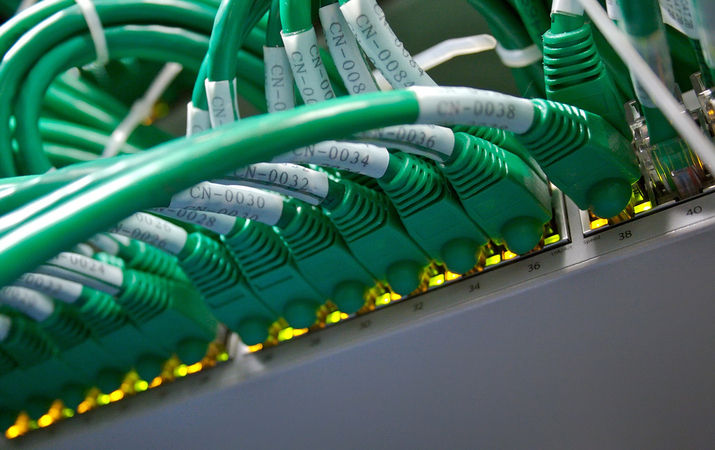
Labeling cables at each end is quite essential, especially when there is a problem. In this case, the cable can be simply identified. By doing so, labeling help reducing the time it takes to track down and resolve an issue. Besides, labeling the cable to power source ensures you are capable of tracing cables to power source, thus making equipment upgrades or replacements easier.
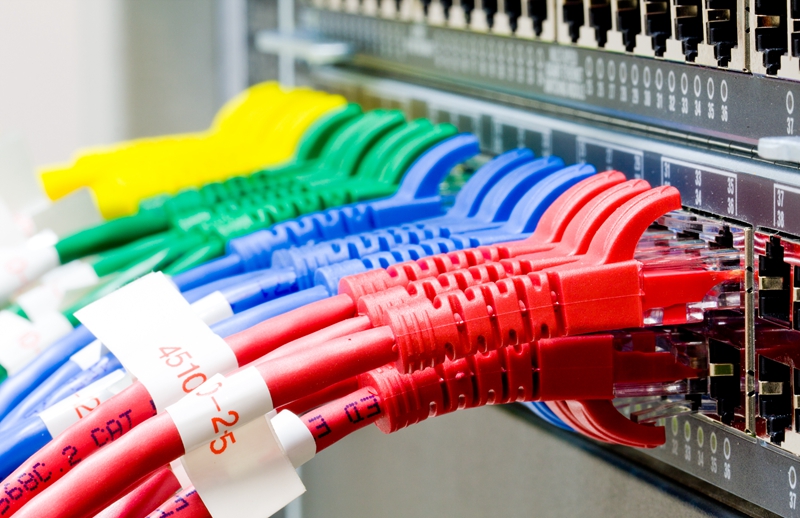
labeling cables

Here are the main benefits of proper and reliable labeling system:
  • Increased Productivity—Simpler troubleshooting and maintenance procedures, which saves repair and movement requirements (both time and costs). You can keep downtime to a minimum and operations running smoothly by being able to track cables, wires and components at-a-glance.
  • Improved Profitability—With the right planning and labeling, you make the job easier and more efficient for your workers, more professional-looking for your customers, and in turn, more profitable for your operations.
  • Heightened Safety and Security—Along with efficiency, convenience and clarity that brought by labeling, it can be used to keep your workplace more secure and more compliant.

Solutions for Labeling Cables

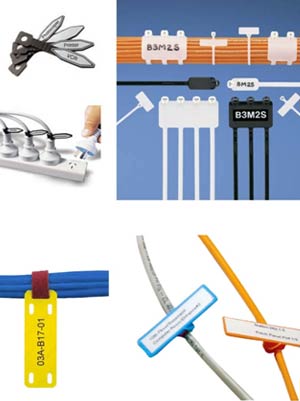
There are a wide variety of labels and makers out there available to help ease your labeling work. Some of the most commonly used ones are illustrated in the following:

Cable Tags

A cable tag typically consists of a tie that loops around cables (or cable bundles), with a tag on the end that used to identify the cable. These tags allow for an easily readable, highly visible flat surface to clearly show the ID. Tags are widely adopted for labeling, ranging from the networking and electrical fields to home-use.
Cable Tags

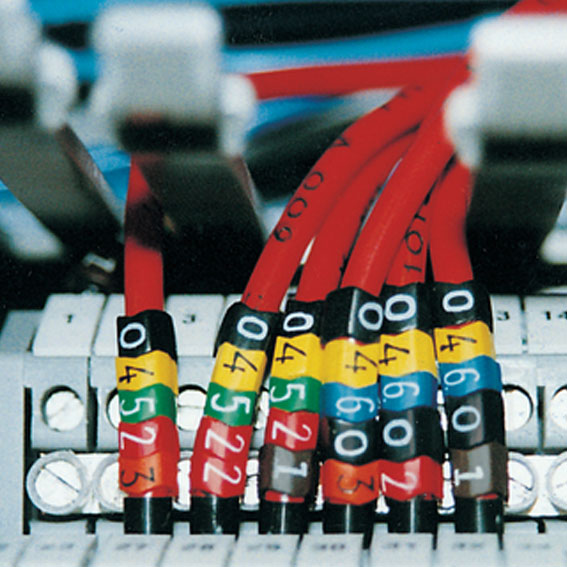
Wire markers are used to wrap around the cable, they typically have an identifying mark, usually a number or a color. This allows you to easily identify a cable at a glance. The numbers and colors of wire marker simplify the labeling process, since it is hard to read longer text around the surface of a thin wire. Wire markers can be a plastic expandable ring that clips around a single cable, with the fact that they aren’t large enough to accommodate bundles.
Wire Markers

These Labels fit around cables, then shrink to conform to the size and shape of the cable via application of heat. This creates a snugly fit label around wires and cables that won't peel or slip off, and can be used in a wide variety of environmental conditions. So, for an application that needs to be long-lasting and withstand tough environmental conditions, sleeves may be preferable to typical adhesive wire markers.
heat shrink labels

Considerations for Labeling Cables

Labeling cables is not a difficult job, but it is time-consuming thus you need to be patient enough. When selecting the label for your cable identification needs, there are at least three factors that need to be taken into account.

Label material: There are various options when it comes to label material, which depend on your specific applications and environment. Polyolefin labels are for wet environment and resistant to chemical and high temperatures; vinyl labels are ideal for non-flat sub surfaces since they offer oil and dirt resistance; while nylon is the optimum choice for use on curved surfaces due to their flexible and strong features.

Cable thickness: Depending on the thickness of your wires or cables, you need to decide which sleeves or self-laminating labels to use in order to make sure they’ll fit. Generally, cable sleeves should have at least twice the height of the cable diameter, and very thick cables can be identified using straps and a cable bundle tag.

Cable Types: If you want to limit the contact surface between your wire or cable and your label, use a P- or T-shaped flag label to leave space for printing a code or bar-code on. When you need to identify cables or wires that are already attached, tags can be used as a non-adhesive alternative. And wraparounds and flag labels are a self-adhesive alternative for terminated cables.

Conclusion
Properly-labeled wires and cables contribute to facilitating data center management, and it offers immediate insight into how your network operates as well as aesthetic appeal. In a well labeling system, you can install and upgrade your infrastructure in a more secure and cost-effective way. So never and ever underestimates the value of labeling cables.

Sunday, December 18, 2016

Ethernet Patch Cable Wiring Guide

Ethernet patch cable has already become a ubiquitous part of our everyday experience. It is generally used for connecting virtually all networking components, providing a flexible and cost-effective way of transmitting voice, data, and multimedia over integrated networks. When dealing with Ethernet patch cables, we sometimes get confused regarding patch cable wiring schemes and when they should be employed. So this article will try to shed some light on this commonly confused subject.
ethernet patch cable

Ethernet Patch Cable and Wiring Standard

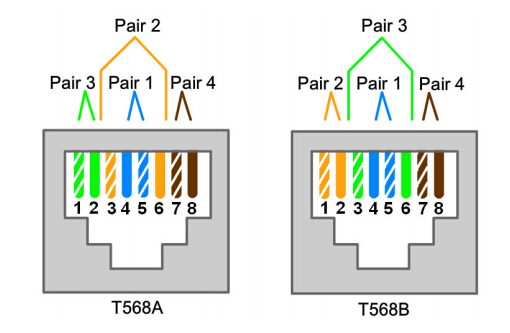
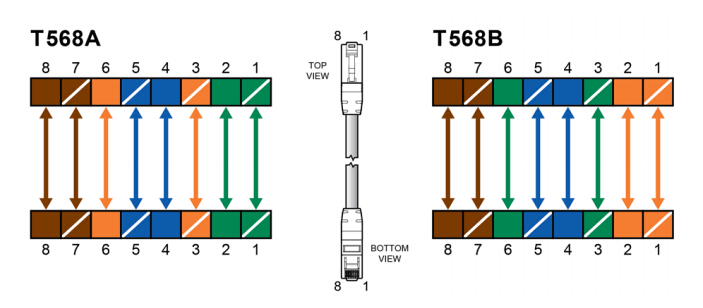
Since the wiring scheme of different Ethernet patch cable varies, we’ d better get to know the categories of it as well as its wiring standard. Basically, Ethernet patch cable comes in two types: straight-through cables and crossover cables. As for the wiring standard, there existing T568A and T568B defined in the ANSI/TIA-568-C.2 standard for 4-pair (8-position, 8-conductor) RJ45 interfaces. When used in traditional fashion, there is no functional difference between patch cords with T568A or T568B wiring standards. Both wiring standards are acceptable and are essentially interchangeable. The only difference between T568A and T568B specification is the orientation of the green and orange wire pairs.
T568A-T568B-ethernet-cable-wiring-standard

Ethernet Patch Cable Wiring Scheme

In the previous part, we have mentioned the common types of Ethernet patch cables. So next we will further explain their features and illustrate the wiring scheme of each in details.

Straight-Through Cables

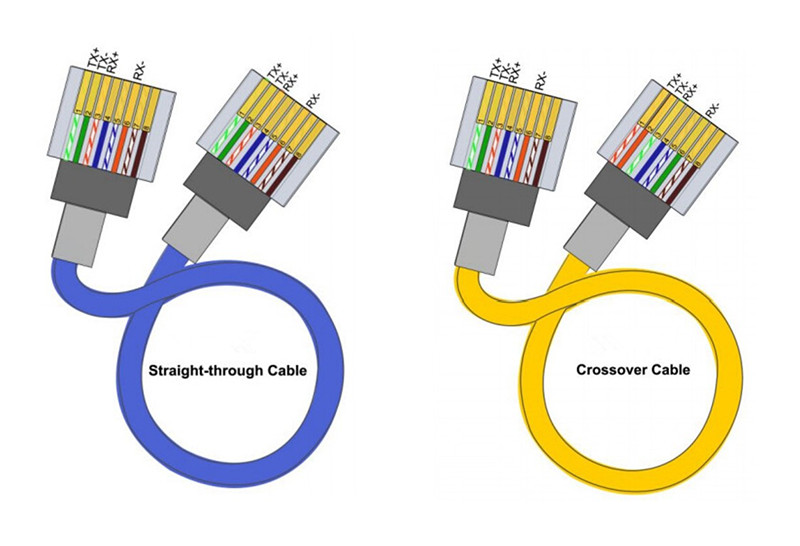
Straight-Through cables get its name due to the fact that both of its ends are configured in the same way. This kind of Ethernet patch cable often adopts the same wiring standard: either T568A or T568B layout. Which means out of the 8 pins on both ends of an Ethernet cable, each pin connects to the same pin on the opposite side. Most Ethernet patch cables on the market are straight-through cables, and they are typically used to connect unlike devices, such as connecting a router to a hub, a computer to a switch and a LAN port to a switch, hub or computer.
straight-through ethernet patch cable

Crossover Cables

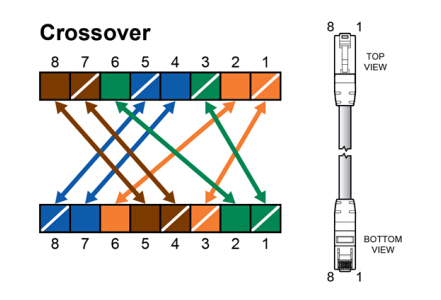
Judging from the physical appearance, crossover cables just resemble that of the straight-through cables. However, the difference actually lies in the order that the wires are arranged: the send and receive pairs in this cable are crossed from one module plug to the other. Crossover cables use two different wiring standards: one end uses T568A wiring standard, while the other applies T568B wiring standard. This Ethernet patch cable is preferred for direct connection between the same devices: a PC to another PC, a hub to hub or switch to switch.
crossover ethernet cable

How to Distinguish Ethernet Patch Cable?

Knowing the difference between the two types of Ethernet patch cables is proved to be useful, especially when connecting them to various components. Let’ s see how to efficiently identify each.

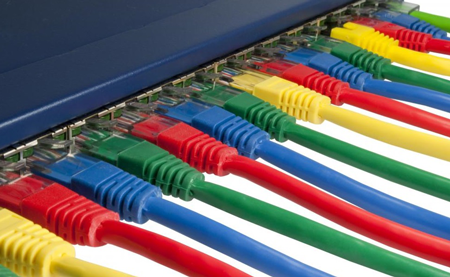
The easiest way to tell what kind of Ethernet patch cable you have is to look at both of its ends together. If both cable ends are configured according to the T568A or T568B standard for both connector ends, then the cable is a straight-through patch cord. But if the patch cable is wired according to the T568A standard at one end, and the T568B at the other end, the cable is a crossover cable. Crossover cables sometimes have orange or yellow sheaths to make them easier to identify.
ethernet network cable

Conclusion

Ethernet patch cable facilitates our life in various aspects, and it also has played a significant role in the development of generic and structured cabling system. I hope this article could help to eliminate any confusion with regard to the features and wiring schemes of different Ethernet patch cables. FS.COM offers a wide range of Ethernet cables (Cat5e/Cat6/Cat7) and accessories. For more information and tutorials, visit www.fs.com.

Sunday, December 11, 2016

How to Design for FTTx MDU Deployment

FTTx has brought us incredible possibilities and total convenience in delivering high-speed bandwidth, no wonder it gains in popularity around the globe. In accordance with the spread of high-speed FTTx service, the demand of an optical distribution for MDU is increasing rapidly. MDU (Multi Dwelling Unit) plays a huge part in the FTTx network and are growing dramatically since it provides a densely concentrated service area for the service provides. This article will illustrate how to efficiently design for FTTx MDU deployments.

What MDU Stands for?

At the beginning, I’d like to briefly explain the definition of MDUs. Known as multi dwelling unit, MDUs generally refers to places such as apartment buildings, offices, and hotels, etc. MDUs come in all shapes and sizes, ranging from high-rise buildings, small condos, duplex units, or multi-use properties with a combination of business and residential customers. This means the structures and conditions of MDUs can be quite diverse. Let’s see how to classify them.
Multi Dwelling Unit MDU

Common Classifications of MDU

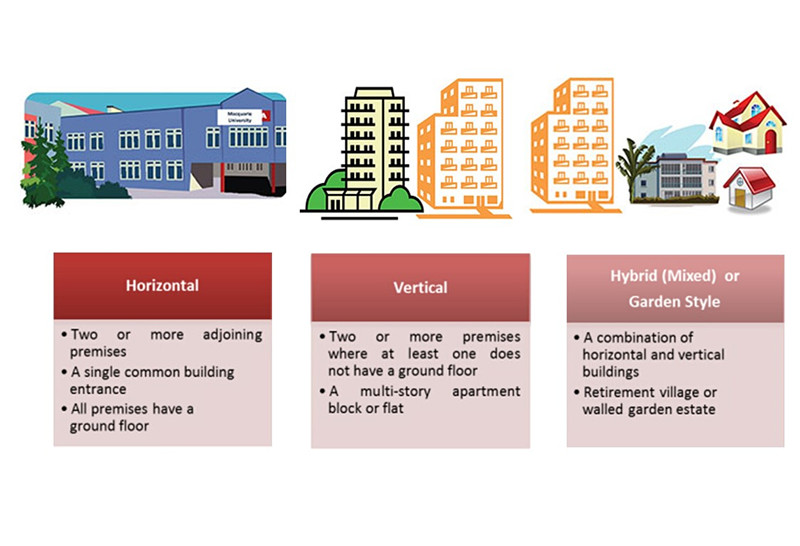
Basically, we can classify MDUs with reference to the construction types, for example: high, medium and low-rise buildings (usually in North America), or just like most of the countries in Europe, simply refer to them as horizontals, verticals, and mixed (hybrid). The details of each will be illustrated in the following pictures.

High, Medium and Low-rise MDU
high-rise,medium-rise and low-rise MDU

Horizontals, Verticals, and Mixed (Hybrid) MDU
Solutions for MDU Deployment with Fiber

Understanding the diverse structures and conditions that may encounter lies the foundation of connecting MDUs into the FTTP network. For different connection scenario, the solution required can be various. For instance, the connection in some cases may be via a feeder fiber directly from the central office / head-end connected to a splitter hub on the premises. While for larger MDU structures, it may involve splitter hubs and subtending riser and drop cable networks with intermediate fiber terminals throughout the building. Since one design doesn’t fit all, the challenge is thus the engineering and design of FTTP network in MDUs.
The following part offers some feasible solutions in regard to the its engineering and designs. Some design scenarios are shown below.

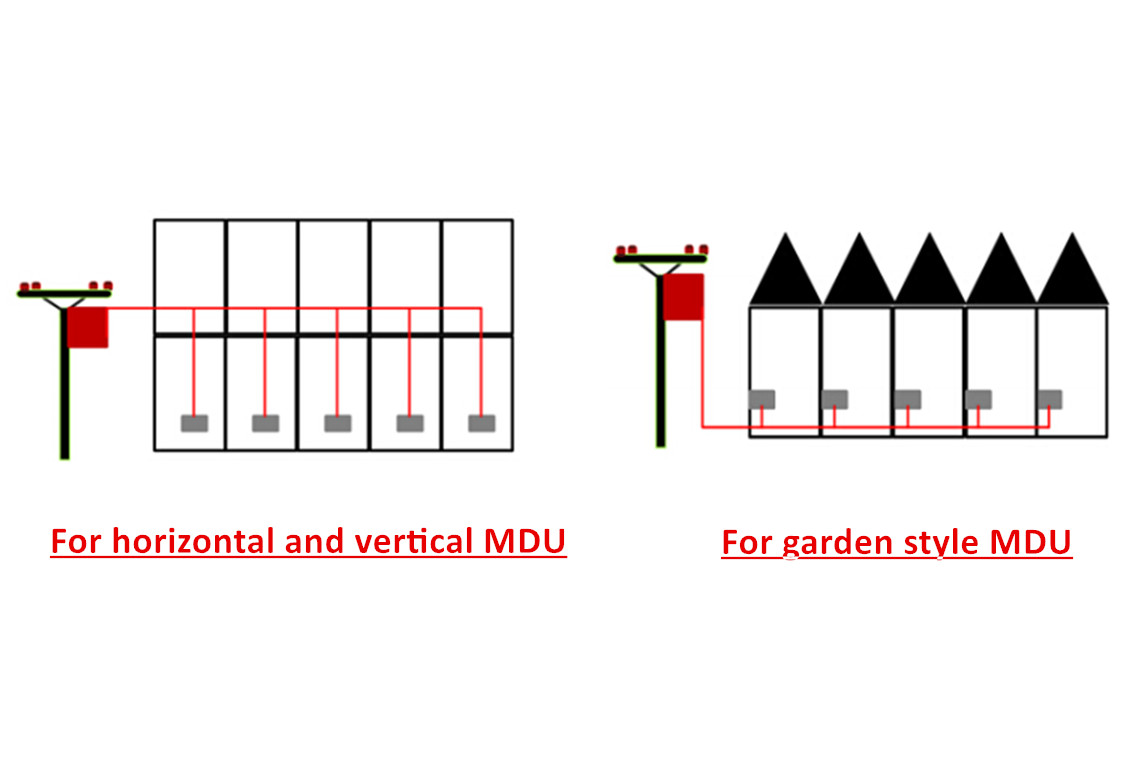
Scenario One: Overhead Pole Feeding

In this scenario, the fiber is designed to deliver from the overhead pole distribution box. Several factors need to be considered in this design:
  • Place the distribution box on the outside power pole
  • Drops placed from the pole DP
  • No permissions required prior to installation
  • ONTs can be inside or outside of the unit
Overhead Pole Feeding

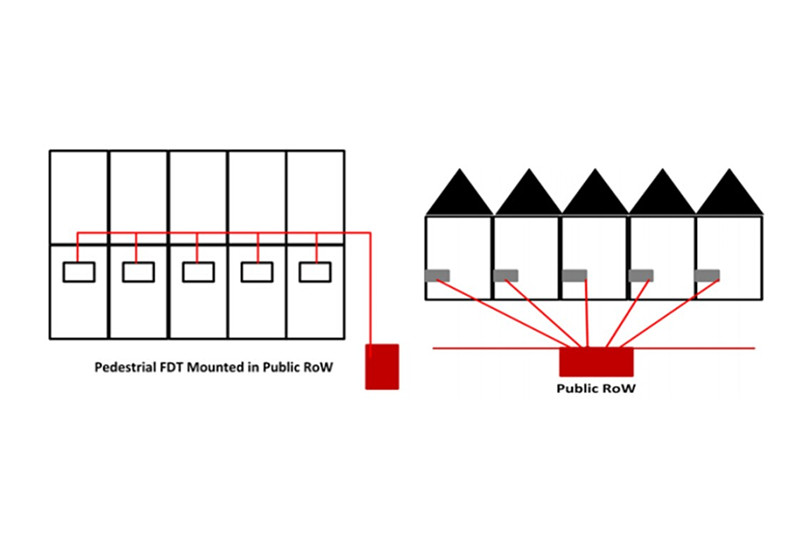
Scenario Two: Underground Feeding from RoW

This design scenario is specifically for high-rise MDU, with fiber serving from underground right of way (RoW) fiber distribution terminal. The design factors include:
  • Fiber terminal will be from underground (pit required)
  • Trench to the property required
  • Pre-place drops or paths creation is required
  • Permissions required prior to installation
  • Additional work required prior to installation
Underground Feeding from RoW

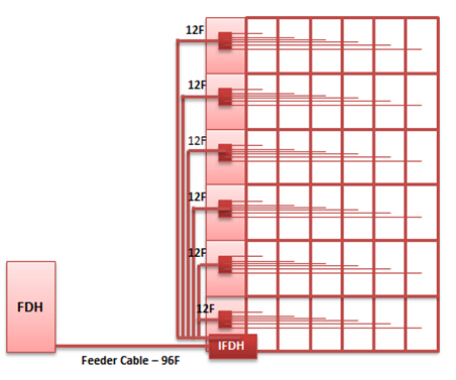
Scenario Three: Multi Floor MDU Design

In this scenario, fiber is designed to serve from an underground fiber distribution hub to each floor with different fiber cables. With a main distribution cable installed to the ground floor distribution point, each dedicated fiber will be installed from the IDP to each floor distribution point. In this way, connectivity can benefit till the end ONT.
  • Fiber terminal will be from underground (pit required)
  • Trench to the property required
  • Pre-place drops or paths creation is required
  • Internal (IFDHs) required
  • Each floor termination boxes required
  • Permissions required prior to installation
  • Additional work for interior is required prior to installation
Multi Floor MDU Design

Conclusion

Effective MDU designs simplify deployment process, ensure simply routing paths and enhance maintenance capabilities. Delivering high speed fiber network to MDU provides rich potential returns and the market is doom to grow in the near future. The design of FTTx MDU is primary yet critical, just take this article as a guide but do remember your choice should better base on the unique requirements of the MDU.

Armored Fiber Cable for Fiber Link Protection

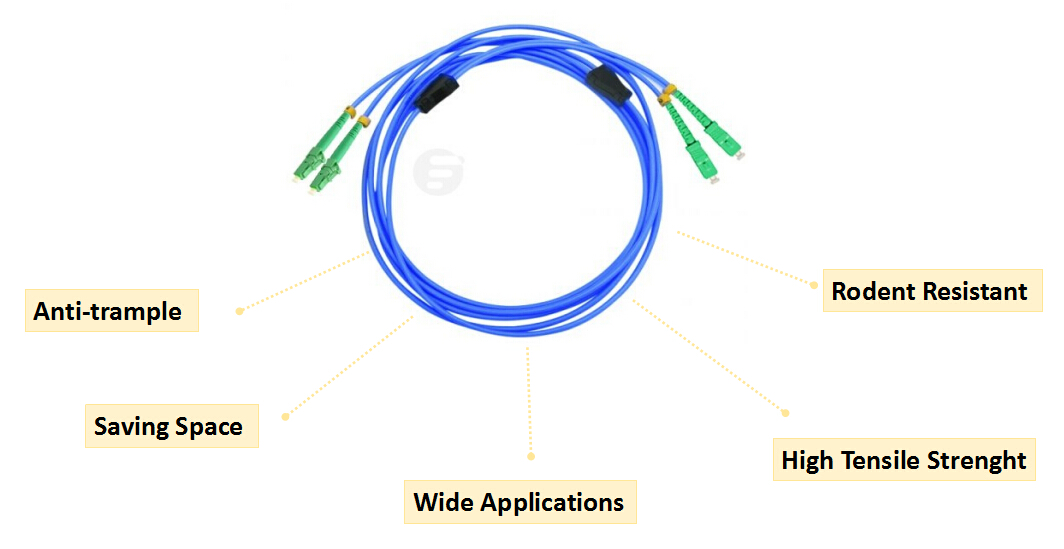
With build-in metal armor inside the outer jacket, armored fiber cable provides extra protection for fiber optic cables. And this is how it distinguishes from standard optical fibers. Therefore, armored fiber cable is more robust and reliable when encountered with rodent, moisture and other issues that may cause damage. Since failures in fiber links can result in an assortment of problems and losses, it is imperative to secure your network with the durable armored fiber cable.

Structures of Armored fiber Cable

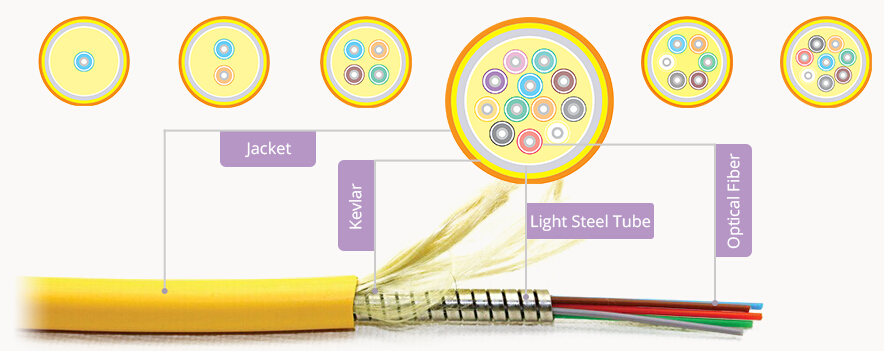
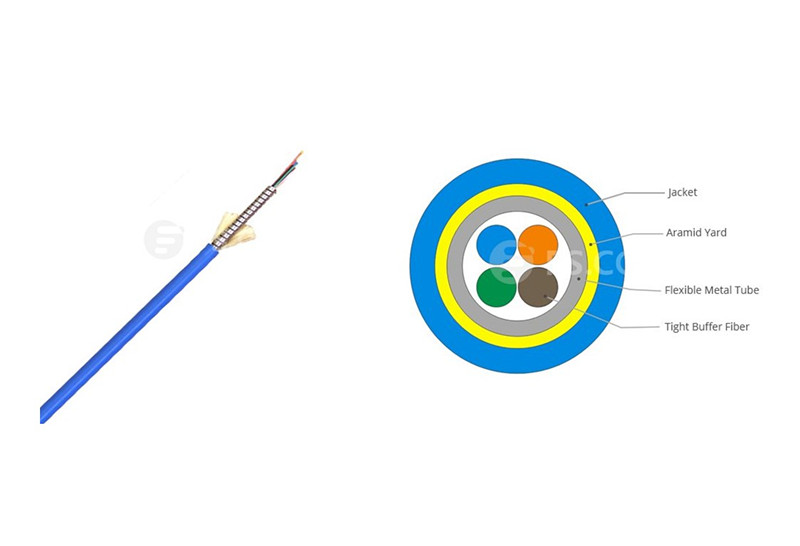
Designed with light weight and durable material, the armored fiber cable is proved to be a rodent, cost-effective and flexible alternative to protect the fragile fiber links. Armored fiber cable comes in an array of types in regard to various applications (indoor, outdoor, indoor/outdoor), therefore the structures of one usually differ from another. I’d like to illustrate the structure of indoor armored fiber cable here, to explain the basic construction of common armored cable.
armored fiber cable structure

Inferring from the picture below, we can see a light steel tube between the optic fibers and the outer jacket, which offers better protection to the fibers in the center. And the Kevlar is placed inside the outer jacket to cover the steel tube. This picture simply demonstrates the most basic structure of armored cable, and it changes according to different usage occasion.

How to Adopt Armored fiber Cable for Indoor Applications?

Generally, three types of armored fiber cable are often employed for indoor applications, including armored patch cables, armored trunks and armored bulk cables. The use of each in different conditions will be explained in the following.

Armored fiber patch cable is widely found in data centers, server rooms and other cabling environments, providing strong and flexible fiber link between devices. Although it is much stronger, armored fiber patch cable is actually as flexible as standard fiber patch cable, and it can be bending randomly without being broken. Armored fiber patch cable can protect the cable from damage caused by twist, pressure or rodent bite, which ensures excellent operation of the network. Installation procedure and maintenance are also easy.
armored fiber patch cable

Armored breakout trunks are used extensively in cable trays and riser shafts-connecting to the horizontal cross-connect or the telecommunications closet. Use of pre-terminated trunks eliminates the need for field termination, thus dramatically shortening installation time and reducing end-user office downtime. Armored breakout trunks are especially suitable for high-speed and high-density network within limited spaces. They are available with various types of connectors, fiber counts (4,6,8 or 12 fibers) and cable rating (Riser OFCR, Plenum OFCP).
armored breakout trunk cable

We basically know that armored bulk cable is commonly applied to indoor, indoor/outdoor and outdoor applications. As for light armored fiber cable which features light weight and great flexibility, it shares much popularity for indoor use. With the prevalence of FTTx, there is a fast growing demand for installing indoor optical cables between and inside buildings. Indoor armored fiber cable is less sensitive to temperature and mechanical stress which offers an ideal choice for direct connectorization. Moreover, it can be used in harsh environments without adding extra protection. Apparently, armored fiber cable provides an efficient solution for all fiber cable problems such as twist, pressure and rodent damage.
armored fiber cable for indoor use

Conclusion

Armored fiber cable provides an optimum alternative to secure your network-by protecting fiber links that exposed to mechanical or environmental damage under normal operating conditions. When selecting the right one for your specific need, take fiber count, fiber type, cable riser as well as termination types into account. For more armored fiber cable tutorial and custom information, visit www.fs.com.


Sunday, December 4, 2016

Use Media Converters to Integrate Copper and Fiber Connectivity

It is neither realistic nor possible for the network to stay static all the time, since the technology and capability of which advances dramatically throughout the world. In this case, there comes the constant demand for a more secure, more reliable and faster network. Media converters are such an ideal solution that designed for this dynamic networks, which enable network managers to take advantage of speed, bandwidth, and security enhancements by linking dissimilar cabling media, for example, cooper and fiber. In this article, we will concentrate on explaining how to apply media converter to your infrastructure.

What Are Media Converters?

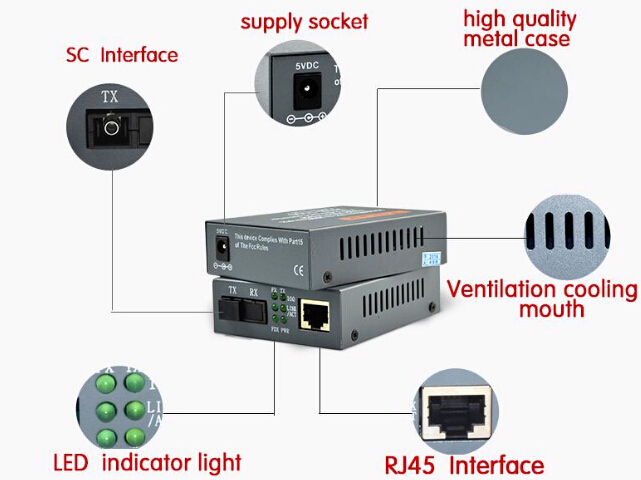
Media converters do just what their name implies: They convert data signals on one cabling medium to signals that can be transported over another medium. Therefore, they provide the chance to extend the life of legacy networks with the latest technology, instead of having to tear everything out and start over when new technology becomes available, or even worse-being impeded by an old technology.
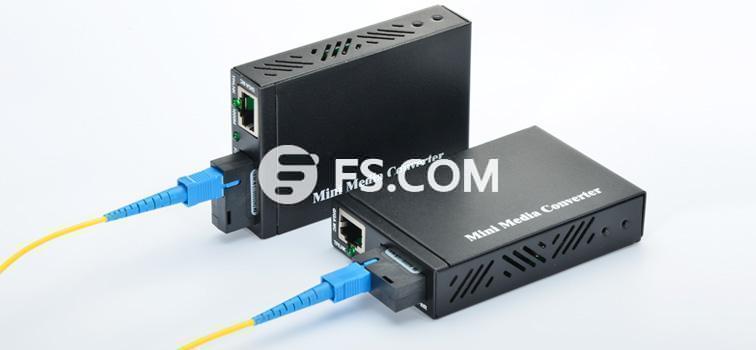
media converter

Media converter facilitates the connection of a multitude of devices by supporting connections to and from switches, hubs, routers, and even direct to servers. It hence brings more flexibility to the network.

Benefits of Using Media Converters

Media converter boosts the evolution of copper networks to faster, more-secure fiber-optic technology without requiring a full network retrofit. It provides the following benefits:
  • Extend network distances by allowing the integration of fiber-optic cable into copper networks to support longer distances.
  • Allow add-on devices, making it possible to connect the newest high-end, high-bandwidth switches and hubs, regardless of connector restrictions.
  • Maximize efficiency and economy in new networks by enabling a high-bandwidth fiber optic backbone to feed copper or lower-speed fiber to work groups and desktops.
  • Increase network flexibility, because media converter can be inserted almost anywhere in the network.
How to Integrate Copper and Fiber Network with Media Converters?

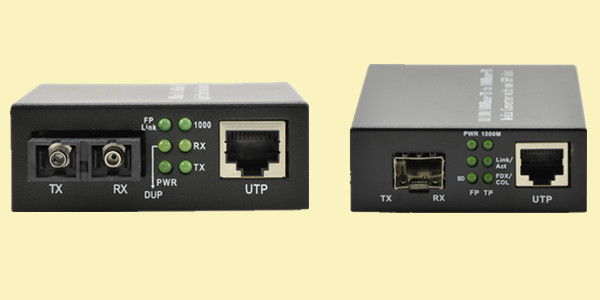
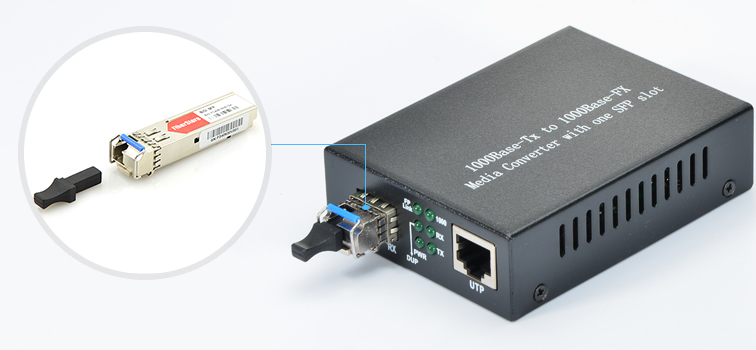
When extending copper UTP Ethernet cabling at distances beyond 100 m (which is maximum for UTP) to fiber optic cabling, a fiber media converter is typically used. Media converters have two types of ports that for copper and fiber respectively. For fiber, there are ports designed for optical transceivers (SFP, XFP, etc.), and for fiber patch cables (SC, LC, etc.). While for copper, ports are all designed for RJ45 copper cables.
fiber-media-converter-ports

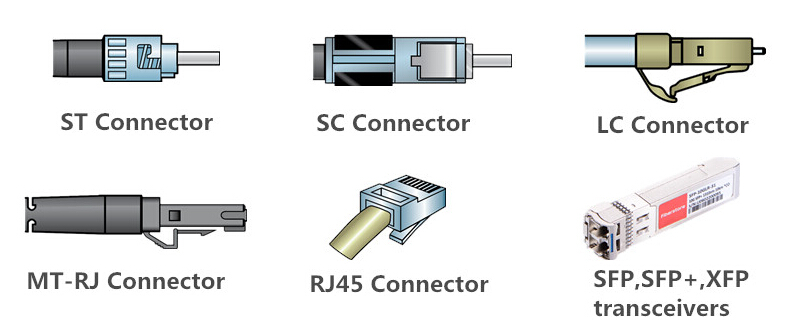
Speaking of employing fiber media converters to the existing network, firstly we’d better know the interfaces of them. The following picture illustrates the commonly used interfaces. Among which the ST, SC, LC, MT-RJ and RJ 45 interfaces of fiber media converters can be connected to target devices directly by patch cords. For SFP, SFP+ and XFP transceivers, things are different. This will be explained in the following.
media converter interface

For fiber media converters with LC/ST/SC/MT-RJ interfaces, simply use a fiber patch cable with the corresponding connector type to connect the interfaces of two media converters directly. The RJ45 port of each media converter is connected to 10/100Base-TX HUB and computer server separately. The two fiber media converters should be supported by electricity.
fiber media converters connected by fiber patch cable

As for fiber media converter with SFP, SFP+ or XFP transceiver interface, the way to connect two media converters is a little bit different. Under this circumstance, two optical transceivers are needed. Additional optical transceiver should be inserted into the port firstly, then the two media converters can be connected via the ports of these two optical transceivers. If the port support 10G and the transmission distance between the two converters is less than 100 meters, then a SFP+ to SFP+ AOC can be used.
fiber media converters connected by optical transceivers

Reminder: In the above illustrations we showed fiber media converters being used in pairs. This is the most vital factor: fiber media converters work in pairs for transmission and conversion.

Conclusion
Media converters are the key to integrating fiber into a copper infrastructure, making it possible to migrate a local network to fiber while extending the productive life of existing infrastructure. In this article, we generally provide connecting method for fiber media converter, as media converters may come in a dizzying array of types, the methods for connecting may depend on the specific condition.

Methods of ADSS Optical Cable Installation

ADSS optical cable, short for all dielectric self-supporting cable, is a type of optical fiber that is strong enough to support itself between structures without using conductive metal elements. Designed with excellent tensile and crush performance that impervious to ice, wind, moisture, corrosion and electromagnetic interference (EMI), it is recommended for harsher environments, aerial or direct burial applications near high-voltage power distribution lines. Regarding the complexity and significance of ADSS optical cable installation, we typically offer some practical information from two aspects: general installation methods and safety considerations.
ADSS optical cable

ADSS Optical Cable Installation Methods

Let’s start this section with the principal question: how to efficiently install ADSS optical cable? Generally, there are two primary methods used for installing ADSS optical cable. The first method is called the stationary reel, or the “Stationary Reel Method,” and the second is called the moving reel, or the “Drive-off Method.”

ADSS Installation with Drive-off Method

The drive-off method (the moving reel) is the simplest way to install ADSS optical cable. This method of cable placement is primarily used during the construction of new lines where there is a clear right-of-way and with no obstructions to vehicles. Here we offer some tips for installing ADSS optical cable with this method.
ADSS optical cable installation using drive-off method

1. Attach the cable to pole-line hardware at the first pole of the cable run. Leave enough excess cable to facilitate splicing. The cable should be able to reach the ground, enter a splicing trailer/truck and be placed in an enclosure.

2. For the cable length, always leave more rather than less. Cap the open cable end to prevent contamination from dirt or moisture. Coil the cable being careful not to exceed the minimum bend radius and tie the loop to the top of the pole.

3. Ground and bond the armor at the first pole. The armor is contacted by means of a clamp (sometimes called “shark jaws”) that pierces the jacket to reach the armor.

4. Cable blocks should be installed at all poles not framed in dead-end hardware configurations. Pay the cable off the top of the reel and manually place it into the cable block. Continue to pay-off the cable slowly and uniformly to keep the pulling tension even.

5. Lift the cable from the cable blocks and place it into the suspension clamp once the cable route has been tensioned as required. Tension the cable wherever there are dead end hardware configurations. Ground and bond the armor at these locations once the cable is tensioned.

ADSS Installation with Stationary Reel Method

The stationary reel method typically contains three steps, which are explained below for your reference.

Step One: Trailer Set-Up

The trailer should be positioned in-line with the strand and twice the distance of the set-up chute to the ground from the chute. This prevents the cable from rubbing on the pole (or reel) or binding on the chute. If the trailer cannot be positioned there, move the set-up chute and cable trailer to an adjacent pole.
The cable should pay-off the top of the cable reel. The pay-off of the cable from the reel should cause a downward force at the hitch of the trailer.
Chock the trailer wheels. Adjust the reel brakes as needed. Place protective barriers and cones as needed to protect pedestrians.
ADSS optical cable installation with stationary reel method

Step Two: Pulling Set-Up

Attach the correct-sized cable grip. Then attach a swivel and a pulling line to the grip. Attention should be given to the tension that is being placed on the cable. There is not a practical method to monitor the tension in the cable itself.

Step Three: Cable Block Placement

Use cable blocks designed to be attached directly to the pole hardware. Pull the cable out along the pole line and lift it into the cable blocks with a cable lifter or by hand from a bucket truck.

Safety Considerations for ADSS Optical Cable Installation

Along with the right installation methods for ADSS optical cable, there is another factor that we can never neglect: safety. For each and every cable installer, especially those work for outside plant construction, personal safety is always prior to all. Hence, in this section let’s discuss some basic safety precautions applicable to ADSS optical cable installations.

Point One: Use protective leather gloves when climbing or descending a pole, and when working with sharp instruments. Wear rubber gloves when working near exposed electrical circuits.

Point Two: Use a safety harness on all bucket trunks and aerial lifts. A body belt and safety strap for the bucket or platform must be used when the equipment is in operation to minimize the chance of injury.

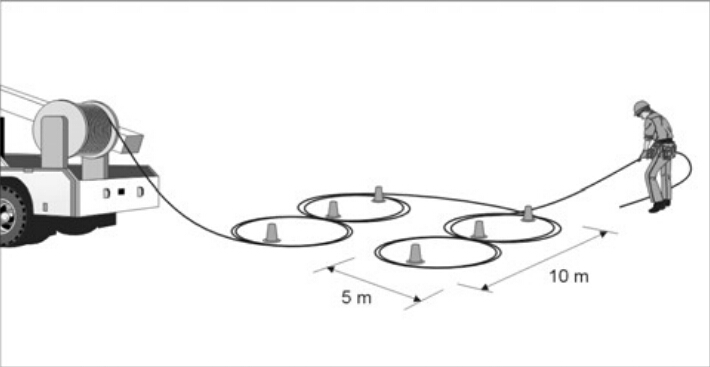
Point Three: Carefully inspect the cable reels for any imperfections that might cause damage to the cable. A “figure-eight” configuration should be used when the cable is removed from the reel and piled on the ground. Remember to protect cable with barricades or cones when placing it on pavement or other surfaces.
laying down a cable in figure eight configuration

Point Four: The transmission characteristics of ADSS optical cable can be degraded when subject to excessive pulling force, sharp bends and crushing forces. So keep the maximum pulling tension and span tension in mind, as well as the minimum bend radius.

Point Five: Temporary or permanent guys should be installed at any location where the self-supporting cable is tensioned, in order to avoid placing an unbalanced load on the support poles.

Conclusion

ADSS optical cable installation can be rather complicated since it is partly influenced by local conditions and environments. Do remember to take your safety as a priority before working on the installation task. The methods described for installation of ADSS cable in this article are intended to be used as guidelines, moreover, the specific circumstances, existing engineering and customer requirements should as well be taken into account.

Sunday, November 27, 2016

Understanding MTP/MPO Connectivity in High Density Data Centers

With the prevalence of cloud computing and big data, there comes a more demanding request for high-speed transmission and data capacity than ever since. In this case, 40/100G networks are more commonplace and now become a trend and hotspot for data-center cabling system. Meanwhile, most IT companies have realized that MTP/MPO cassettes, patch cords, connectors and adapters are essential backbone to their infrastructure. So, we will explain some basic factors in MTP/MPO connectivity in this article, with the purpose of better understanding this connectivity method.
MTP/MPO Connector Explanation

The need for transmission speed and data volume over short distances must be satisfied by choosing the right type of connectivity. So let’s start from the most basic yet critical part of MTP/MPO connectivity—MTP/MPO connector. It is known that 40/100G transmission utilizes parallel transmission, in which the data is simultaneously transmitted and received over multiple optical fibers (click here to know more about serial transmission and parallel transmission), thus a multi-fiber connector is required. MTP/MPO connectors which have either 12 fiber or 24 fiber array, will better support this solution.
MTP/MPO connector is the up-and-coming standard optical interface for 40G and 100G Ethernet network. The terms “MPO” and “MTP” are used interchangeably for this style of connector. MPO is the generic name for this Multi-Fiber Push On connector style. While MTP is a registered trademark and identifies a specific brand of the MPO-style connector.
MTP MPO connector

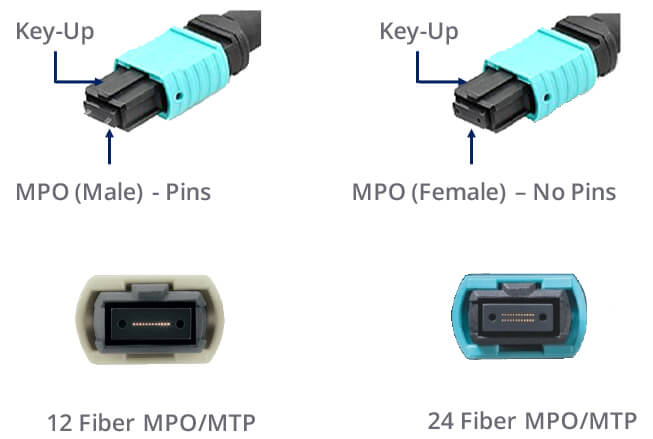
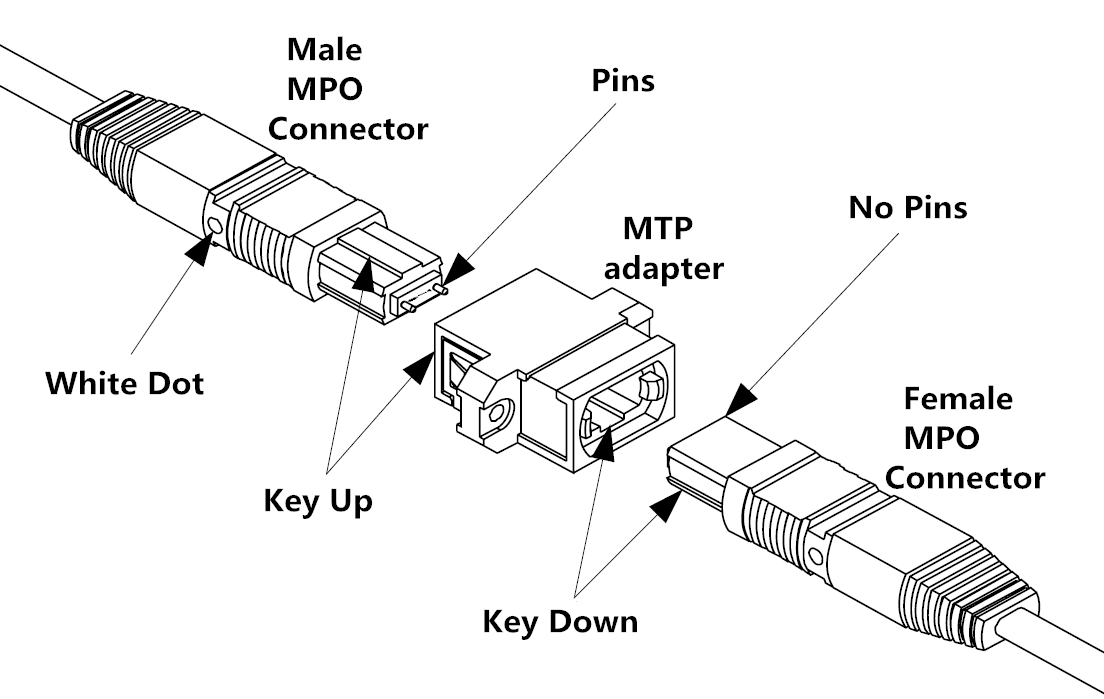
MTP/MPO connectors are pin and socket connectors-requiring a male side and a female side. Cassettes and hydra cable assemblies are typically manufactured with a male (pinned) connector. Trunk cable assemblies typically support a female (unpinned) connector. The connectors are also keyed to ensure that proper end face orientation occurs during the mating process.
MTP MPO connectivity

Functions of MTP/MPO Connectivity in 40/100G Network

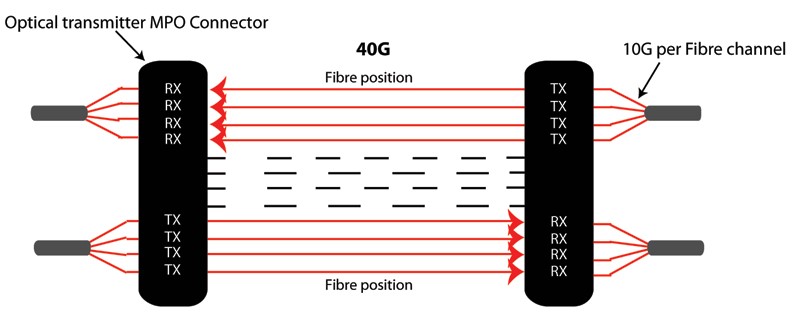
The widely used 10G system generally would utilize a single MTP/MPO (12 Fiber) connector between the 2 switches. Modules are placed on the end of the MPO connector to transition from a MPO connector to a 12 Fiber breakout LC duplex or SC duplex cable assembly. This enables connectivity to the switch. 40G and 100G systems require a slightly different configuration.
In 40G MPO connectivity system, an MPO connector (12 Fiber) is used. 10G is sent along each channel/fiber strand in a send and receive direction. This “lights up” 8 of the 12 fibers providing 40G parallel transmission.
MTP MPO connectivity 40G

For optical 100G MPO connectivity system, an MPO connector (24 Fiber) is used (or alternatively 2 x 12F MPO Connector). 10G is sent along each channel/fiber strand in a send and receive direction. This “lights up” 20 of the 24 fibers providing 100G parallel transmission.
MTP MPO connectivity 100G

MTP/MPO Connectivity Components

Along with MTP/MPO connector, there are some other MPO components that used in high-density network interconnection. In essence, part of the MTP/MPO connectivity solution is a variety of fiber optic cabling components. Generally, there are two types of cables used in this solution:

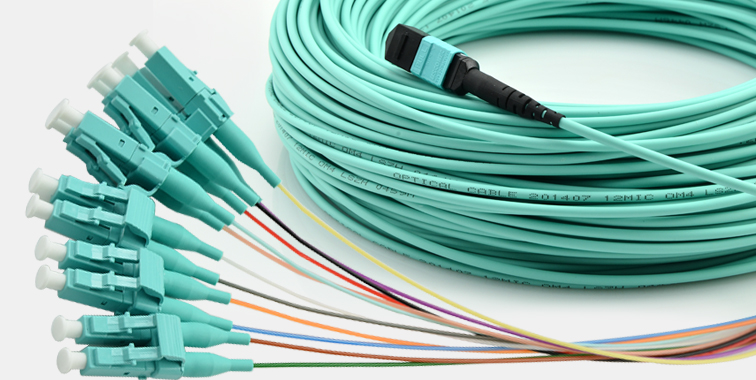
One is a standard MTP trunk which has an MTP/MPO connector on either end of a 12 or 24 fiber ribbon cable. The connector construction can vary to the point where the 24 fibers are terminated into a single MTP/MPO connector, or they can be terminated into 2 separate 12 fiber MTP/MPO connectors.
MTP MPO trunk cable

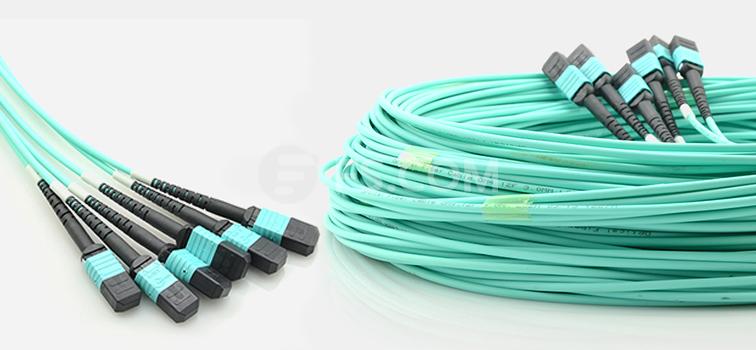
Another option used in this cabling configuration is a MTP/MPO breakout cable. This cable has an MTP/MPO connector on one end while the other end of the cable can have a variety of standard optical interfaces such as LC or SC connectors.
MTP MPO breakout cable

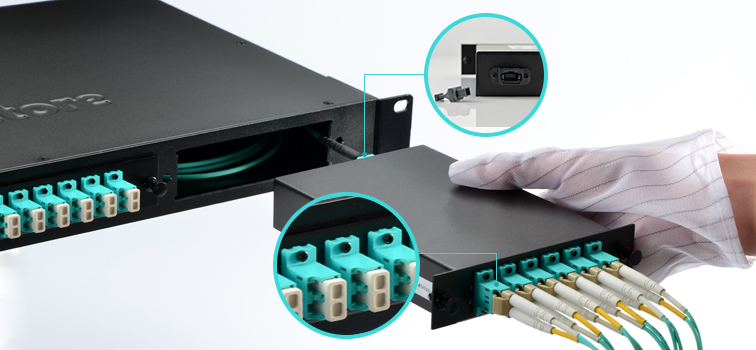
Moreover, these can connect directly into patch panels, MTP cassettes and active equipment. The MTP/MPO cassettes provide a central patching and fiber optic breakout point where the MTP interface can be changed to SC or LC type interface. MTP/MPO cassettes are typically housed in patch panel or fiber storage tray.
MTP MPO cassettes

Conclusion

In summary, MTP/MPO connectivity solution has proven to be an effective, feasible and flexible option to achieve 40/100G transmission, especially with the case of large- capacity and high-density data center environment. Not to mention that it also provides a reliable alternative for quickly connecting and rapid deployment. Hope the information offered in this article could at least help you understand this connectivity method. And for more information about MTP/MPO connectivity tutorial and products, please visit www.fs.com.

Considerations for Smooth 40/100G Migration with Fibers

We are now basking in a great boom in data transmission and information exchange, which results in an ever growing demand for higher speed and more reliable network. Currently, to migrate from legacy 10G to 40/100G network has become a hot topic yet irreversible trend. Part of this evolution, of course, was installing fiber optics in more network interconnection scenarios instead of copper cable. Among various connectivity methods, fiber optic cables have become the ubiquitous transport medium in the data center network. So, when employing fiber optic cable for 40/100G migration, some key considerations should be taken into account. That’s what we are about to explain in the following parts.

Selecting the Right Type of Fiber (Common Approaches Overview)

For data centers, the most cost effective fiber solution is a multimode fiber system. Surveys have shown that more than 80% of data centers are equal to or less than 100 meters. Moreover, multimode fiber transceivers are much less expensive than single-mode transceivers because they use a vertical cavity surface emitting laser (VCSEL) light source, which is easy to manufacture and package.
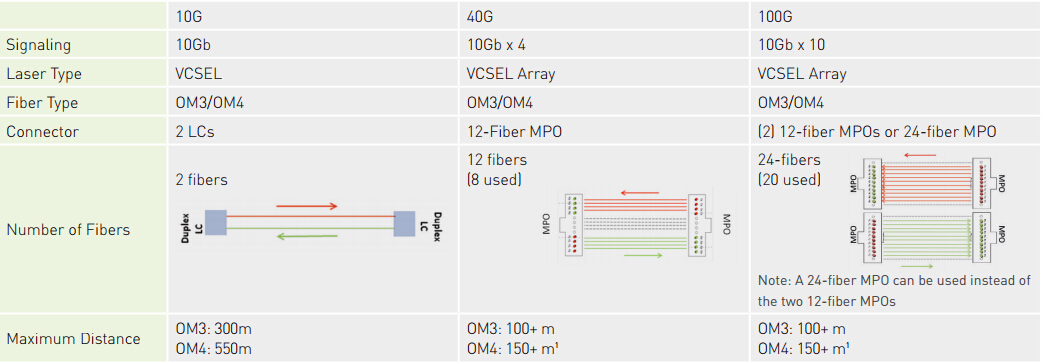
Although single-mode cable is less expensive, while concerning the total system cost of multimode versus single-mode, multimode becomes significantly less expensive. Thus selecting the right type of fiber will do you a good return in the long run. The following diagram presents some common approaches used in data centers. Each approach uses short-wavelength (850 nanometer) transmission over multimode fiber.
fibers-for-40/100G

According to the diagram, it is clear that the fiber system should be designed with OM3 or OM4 MMF to support 10G and beyond applications. OM3 supports 10G up to 300 meters, but only supports 40/100G up to 100m. OM4 supports 10G up to 550 meters, but only supports 40/100G up to 150 meters. If planning to support 40/100G in the future, the channel cannot be designed for the maximum distances that 10G can support. You should better design for the application that has the most stringent requirements (usually the fastest data rates) even if the application is a future installation.
Several Other Important Factors

Besides selecting the type of fiber, there are several other essential considerations to enable successful 40/100G migration. Which include channel insertion loss, polarity and alignment pins.

Channel Insertion Loss (Loss Budget)

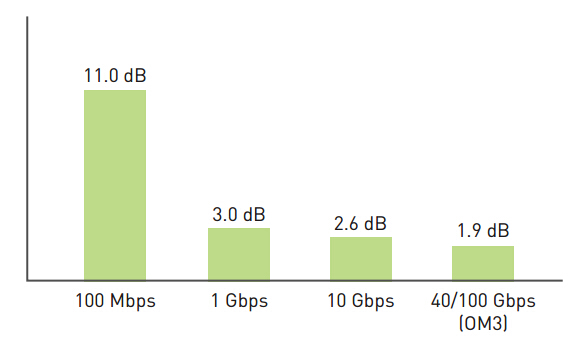
The channel insertion loss is made up of the insertion loss (IL) of the cable, the insertion loss of all mated connector pairs and the insertion loss of splices in that channel. And as the data rate increases from 10 Gbps to 40/100 Gbps, the total channel insertion loss decreases noticeably. The following picture shows total loss budgets for a 100-meter channel at different data rates common to current Ethernet applications. As data rates progress from 100 Mbps Ethernet-based systems to 10 Gbps Ethernet-based systems, the optical loss budgets have shrunk considerably from 11 dB to 2.6dB. 40/100 Gbps Ethernet systems have an even smaller budget of 1.9 dB when using OM3 or 1.5dB when using OM4.
channel insertion loss in 40/100G

Polarity

Proper polarity ensures an optical path from the transmit port of one device to the receive port of another device. There are several different methods to maintain polarity, but do remember that the different methods may not be interoperable.
Generally, there are three methods depicted in the TIA standards: Methods A, B and C (for more details click here). And each method requires a specific combination of components to maintain polarity. Here we take duplex signaling which uses an MPO backbone cable, cassettes and patch cords for example. The following shows the component options that are used in specific combinations for each of the polarity methods:
  • MPO-to-MPO backbone cables: Type A, B or C
  • MPO-to-LC cassettes: Method A or Method B
  • Patch cords: Type A-to-A or Type A-to-B
patch cords polarity

Polarity becomes more complicated when migrating to 40/100G because parallel transmission replaces duplex transmission. Parallel optical fiber links integrate multiple transmitters in one transmitter module, multiple fibers in fiber array connectors and multiple receivers in one receiver module. Multiple transmitters and receivers may also be integrated together in a transceiver module.

Alignment Pins

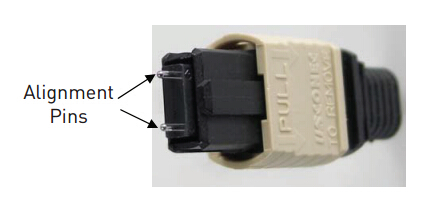
When mating connector plugs that use alignment pins, like the MPO connector, it is critical to ensure that one plug is pinned and the other plug is unpinned. Since general transceivers that accept MPO plugs are pinned, they accept only unpinned plugs. The picture below shows an MPO connector with pins installed.
MPO connector

The pinned connector is typically located inside the panel to help protect the pins from being damaged (i.e. the fixed connector is pinned and the connector that is frequently removed and handled is unpinned). For example, cassettes are typically pinned and trunk cables are typically unpinned. Do make sure the alignment pins are properly cleaned, or it could collect debris around the pins, which results in the two components not mating correctly.

Conclusion

To sum it up, for fiber installation in 40/100G migration, multimode fibers systems are more common and cost effective than single-mode systems for short distances. Select at least OM3, while OM4 will provide longer distance support or more connections over shorter distances. Channel insertion loss is the foundation, so consider high-performance, low loss components. Moreover, consider the polarity method to be used and for parallel transmission uses array connectors, decide which components require pins and which do not.

Monday, November 21, 2016

Advice on Pulling Fiber Optic Cable

According to many experienced cable installers, fail to pull cable properly will eventually lead to a series of network problems and disasters. Since installing cable is a routine yet fundamental task, its importance thus cannot be underestimated. Therefore, to ensure a smooth and efficient cable pulling process, installers should get fully prepared for the work, and take various factors into consideration to avoid damaging the cable. In this article, we try to explain how to prepare for pulling fiber optic cable and as well offer suggestions to help get the work done.

Before-Pulling Considerations

Preparation always serves as the very primary phase of the whole installation task. It can impact other stages in the process of pulling fiber optic cable. To get well-prepared, the following factors must be valued.
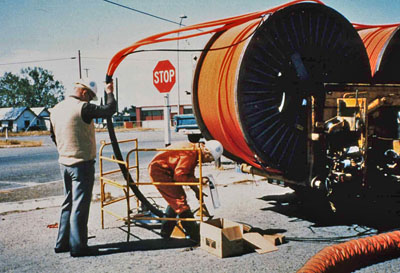
pulling fiber optic cable

1. Avoid Cable Damage

The first step in pulling  fiber optic cable is to measure and cut the material. Inaccurate measurements can result in disastrous issues. The glass fiber within the cable is fragile and requires greater care during the process of cable pulling. Damage to cable can come in many forms, and the common broken fiber is difficult to detect. The most common form of damage, a broken fiber, is also the most difficult to detect.

2. Despooling Cable Properly

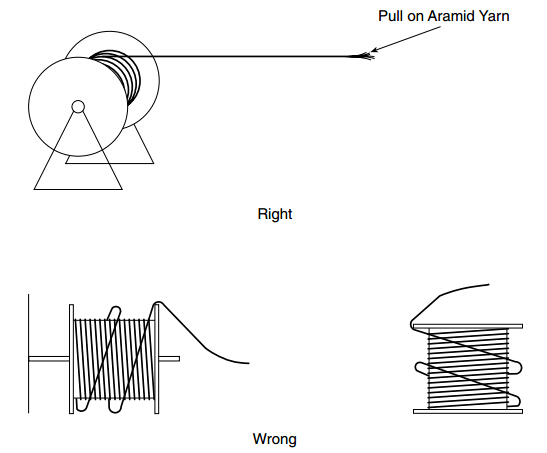
Improper pulling and despooling of the cable can cause optical cordage failure. One should also avoid cable twist when despooling fiber optic cable to prevent stressing the fibers. Therefore, cable should be reeled off the spool, not spun over the edge of the spool. This will eliminate cable twist, which will make coiling much easier.
despooling fiber

3. Pulling Force

The pulling force must be kept below a designated limit for the specific cable being installed. This is usually 600 pounds for outside plant (OSP) cable and 300 pounds or less for other cables. The pulling force must also be kept uniform. When using power equipment to pull OSP cable, tension monitoring equipment or breakaway swivels must always be used.

4. Bending Fiber Too Tightly

Another most common problem is bending the fiber on too tight a radius. A minimum bending radius of 10 cable diameters must be maintained over long-term, static conditions. When cable is placed under a tensile load while being pulled, a minimum of 20 cable diameters is recommended.

Which Jacket Type Is Right?

Indoor (Plenum): The cable is rated for all indoor installations, including plenum rated spaces. A cable rated for plenum installation will have low-smoke characteristics.

Outdoor: Outdoor cables are filled with a water blocking jell and are rated for all outdoor applications except for "direct bury". This cable is suitable for underground installation in conduit, overhead lashed to a guy wire, or secured to a building or other permanent outdoor structure. The only difference between outdoor (jell-filled) and direct bury cable is that the latter has an added overall metallic sheath which gives it protection from rodents.

Indoor/Outdoor: Indoor/Outdoor cables are approved for use in underground conduits, even if the possibility of water infiltration exists. Indoor/Outdoor cables are not recommended for aerial installations. This cable has an overall PVC sheath and is not rated for plenum spaces.

Procedures for Pulling Cable

Step One: Inspect the cable run to ensure there are no sharp bends or corners that exceed the minimum bend radius of the fiber.

Step Two: In many runs, if the pulling distance is short enough and the pathway straight enough, fiber-optic cable can be pulled by hand, without the use of special equipment. However, first make sure the pull does not exceed the tensile-loading limit established by the manufacturer for installation.

Step Three: When additional mechanical force is needed for a pull, use external pulling grips. This device locks onto and tightens around a cable as a tensile load is applied. The load is applied to the strength members of the cable rather than the optical fiber, itself.

Step Four: With some cables, such as outside-plant cable, it may be necessary to attach the pulling grip to strength members that surround the cable core as well as the outer jacket. This is done by sliding the grip past the end of the cable and then cutting the cable jacket back to expose the strength members.

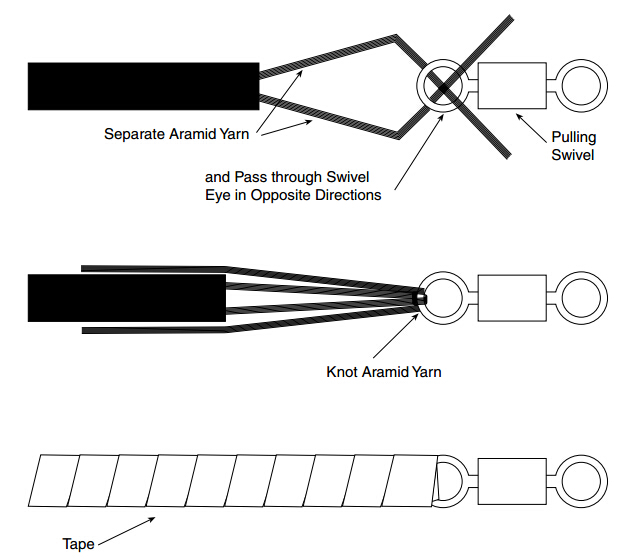
Step Five: Use a swivel when pulling fiber optic cable to make sure twists in the pull rope are not translated to the fiber-optic cable. Also, use a tension meter to monitor the tension being applied to the cable during the pull.
procedures of pulling fiber

Step Six: After pulling fiber optic cable, cut off approximately 10 feet of cable from the pulling end to remove any portion of the cable that may have been stretched or damaged during installation.

Note: Leave enough cable at either end to reach the work-area and closet terminating locations. You are now ready to terminate or connectorize the cable.

Conclusion
Pulling fiber optic cable is a dispensable and rather important part in fiber cable installation. During the process, installers should avoid cable damage, despoiling the fiber properly, and take pulling force into account. Since the real fiber pulling environment could be more complex, the recommended procedures we offered below simply provide guideline, and I hope it can be helpful.